Parts Needed
You will need:
2 XBee radios, one for the computer and one for the sensor.
Make sure that you get the “series 1” radios. The “series 2.5” radios have some extra mesh-networking capabilities, but only collect analog data up to 1.2 V and are not as convenient for point-to-point use.
1 XBee Explorer board. This allows you to connect one of the XBee’s to your computer. It also allows you to update the firmware and configure the XBee radios. You’ll need a USB mini-cable also, unless you have one already.
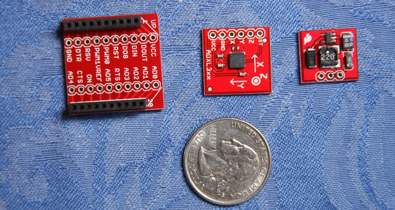
1 XBee Breakout Board. The XBee has a different pin spacing than the standard 0.1” spacing on most proto-boards, and this is the easiest way to make a socket for your remote XBee. This piece is on the left in the photo above.
2 2mm 10pin XBee Sockets. Yep, the breakout board comes without sockets. Rather than solder your XBee radio into the board, you’ll need these.
1 3.3V step-up converter board. This marvelous little board takes 1-3V in and puts out regulated 3.3V. The XBee requires 3.3V, and with this converter you can run it off a single 1.5V battery.
1 3-axis accelerometer board. This is shown in the center above. SparkFun has several of these that work from ±2g to ±18g. Pick the range that works best for your experiment. You could also get the accelerometer chip by itself, but it’s a lot easier to work with the chip on the breakout board!
Some break-away header pins.
1 proto-board. Radio Shack has 1.5” square proto-boards that work nicely.
Capacitors. These are technically optional, but I found that I could reduce the noise slightly by adding a 0.1µF capacitor to the Vcc and Vref pins on the XBee, 0.1µF to the Vcc on the accelerometer, and 47µF on the output of the step-up converter board.
1 Battery holder. I used an N-cell holder from my local Radio Shack. If you wanted to shave weight even more, you could probably run this off a CR-2032 calculator battery, and Radio Shack has holders for those also. (I haven’t tried this, though!
1 Battery. It should fit in whatever battery holder you have.
I got most of my parts from SparkFun.com. They have a lot of interesting components, so be careful or you’ll get sucked in.
